
TLR? SLR?
The Gakkenflex is a twin-lens reflex camera - a TLR. A TLR, just like the better known SLR (for single-lens reflex) is a solution to the age-old problems of "how do I see what I'll get, and how do focus this thing?" It uses two lenses, one to focus and one to actually take a picture.

A TLR to the left and an SLR to the right.
The idea with the TLR is that you have two lenses: the upper lens points to a mirror and then on to a focusing screen on top, while the lower lens points directly at the film or digital sensor. The lenses have the same focal length and are mechanically coupled, so that they both show the same scene and are always focused at the same distance.
The result is a compact, light, simple and reliable camera in a convenient rectangular package. With separate lenses there is no shutter lag and no finder black-out when you take the picture. It's one of the great design successes in the camera world. Hundreds of models have been made, by dozens of companies over the years, all with the same basic design.
There's a few drawbacks, though. The two lenses see the world from somewhat different angles, so close up the finder no longer shows you exactly what you'll get. The design makes it difficult to use polarisers and split-density filters, and if you want replaceable optics you need sets of two lenses for every focal length. The solution for that is the now very popular SLR. As you can see on the right above, we replace the two lenses with just one lens, and make the mirror flip up and down. When down it shows the image on the focusing screen, and when up it lets the image through to the film or sensor. We'll see exactly what we're going to get.
The SLR is another trade-off, of course. The finder goes dark while you take the picture, and as the mirror needs to move away there is a noticeable time lag between pressing the shutter and taking the picture. Also, the mechanism is quite noisy and vibration prone, and the faster you make the mirror the more noise and vibration you get. An SLR typically needs to use faster shutter speeds than other camera types or you get blurry images.
One drawback of the TLR is that the finder image is flipped left-to-right - but the image is flipped on an SLR focusing screen too. We get a correct image in most SLR cameras because we add a prism on top of the finder. This prism re-flips the image and projects it straight back so we we can look through straight ahead. Nothing prevents you from adding a prism to a TLR finder. We use a prism for 35mm SLR cameras because the small focusing screen is hard to see and hard to focus. Most TLR cameras are medium format, and to cover the large, bright focusing screen you need a very big, heavy glass prism. The Pentax 67 I've written about has a removable prism that weighs more than half a kilo - half the entire camera weight - so I normally never use it.
Construction
The Gakkenflex is a kit camera - you get the parts and put it together yourself. The kit consists of a thick booklet and a tray with all the camera parts. The booklet is a fun, informative look at the history and mechanics of the TLR, tips for using the Gakkenflex, various ways you can tweak and change the design and so on. The instructions are detailed, with clear step-by-step illustrations.
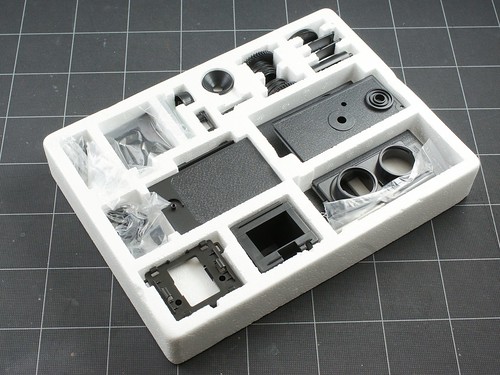
All parts, in the tray.
We begin by assembling the sides with the film winder. The left side here has the film "counter" - a toothed wheel that will rotate half a turn for each 35mm frame.
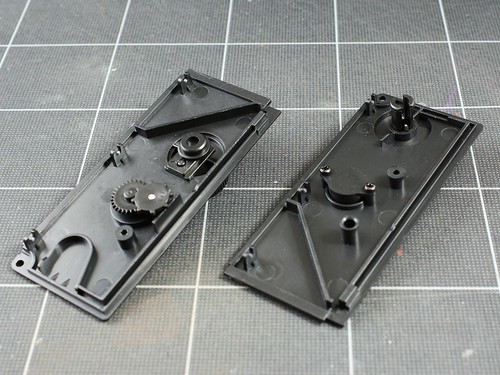
The shutter parts to the left, and the finished shutter on the backside of the front plate to the right. This is the most complicated part of the camera.
The camera uses a leaf-shutter; the longish leaf-like blade in the picture above that covers the center hole is the shutter itself.
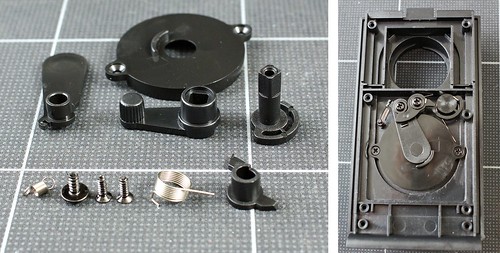
That leaf is spring loaded - you see the spring top left. There's a one-way catch, like a door latch, on it halfway up, and a curved hammer-like part in the top center, sits right next to it. That hammer is also spring loaded, so if you rotate it counterclockwise, against its spring, it'll swing down, pass by the catch and wind up the spring.
If you then release the hammer it'll rotate clockwise, grab the catch and push the leaf away from the lens opening. As it continues to push, the catch will slide off the edge of the hammer and the leaf spring will return the leaf to cover the opening again.
We tension and release the hammer by the shutter lever on the right. It has a catch too - the outer half-circle - that grabs the hammer. As you push the lever the catch tensions the hammer, until it slides off the catch and releases the shutter as above. The lever is spring-loaded too (that's the large spring in the center on the left), and will return the lever when you release it.
The harder the hammer spring, the faster the leaf will be pushed away. And the harder the leaf spring, the faster it'll return - but then you'll need a still harder hammer spring to work against the leaf spring. The included springs give you a shutter speed of around 1/100 seconds, but you can of course change it by replacing the springs.
Neat, simple design.
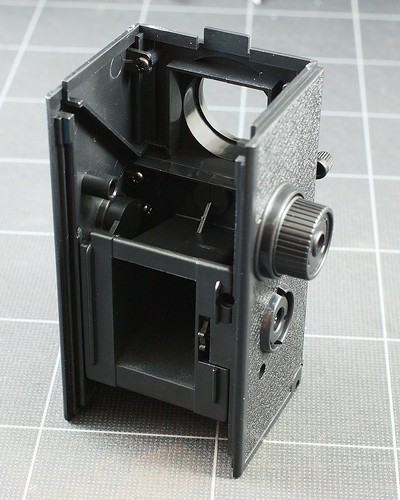
We've put the front plate, the sides and the film chamber together. The slanted grooves at the top is where the mirror will go and the round hole is for the upper focusing lens.
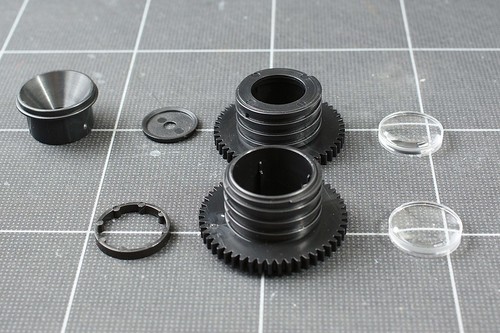
Here's the lens assemblies. The upper row is the picture taking lens with its aperture disc, and the lower is the focusing lens. The two lens elements are identical; there's no particular reason they must be, though. Many TLR cameras have a simpler and cheaper, but brighter, focusing lens with a larger open aperture. You want as much light as possible for focusing and the image quality doesn't matter so bright and cheap makes sense.

Add the mirror and screen, the back plate and the finder shade/covers (here opened up), and we're done. One Gakkenflex, freshly born.
You focus by turning the lenses. The lens barrels are threaded - one clockwise, one counterclockwise - and they are coupled by the gear teeth around the rim. As you screw one lens in and out, the other lens follows right along.
The knob on the upper left in the picture is for winding the film, lower right is for rewinding it. The lever at the front is the shutter.
Done! Now, what have we got? A tiny, so-light-it-probably-floats 35mm camera with fixed - around 1/100-ish - shutter speed and fixed aperture about right for 400 ASA film. I'm not kidding about the size or weight; put it in a coat pocket and you'll forget it's even there. The construction is not very sturdy, but then, it really doesn't have to be.

The Gakkenflex together with a Yashica Mat - really a lightweight, compact camera, but it looks big and menacing next to the tiny 35mm Gakkenflex.
The finder is portrait oriented and 35mm-sized, which makes framing a challenge and focusing mostly guesswork. Bring a loupe or magnifying glass to make it easier. The taking lens is a single element, so we're sure to get lots of interesting effects near the corners of each picture. The ability to focus is a step up from the Fuji single-use cameras, but while Fuji tries to minimize lens aberrations, the Gakkenflex positively celebrate them.
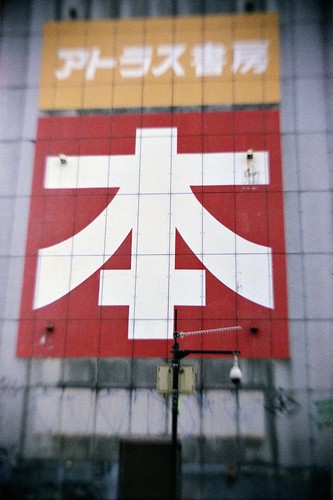
Book. Painted ad for a long-gone bookstore on Nagahori street, Osaka.
This pretty much sums up the kind of image quality you get: colorful, a little dreamy, with decent detail in the center that fades to dark, vignetted blur towards the edges. And of course both focusing and framing is hit and miss.
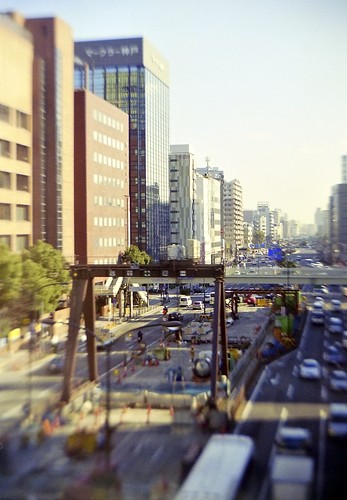
You can take fairly normal outdoor shots, but you can also easily use the blur to give you a fake toy- or model-like quality to your images. Here's one of the main roads through Kobe.
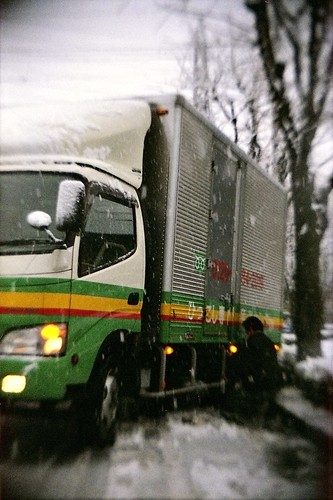
With darker scenes you may have to brighten afterwards, and that brings out the vignetting in the corners. Here a delivery truck is stuck on an icy slope in Ikoma, with the driver putting on snowchains. It's getting hot and humid here in Osaka now, and this picture makes me miss winter.

The fixed shutter speed is no problem in low light - just hold the camera steady and take multiple exposures. With care it'll look no different than a single shot. This is Nakanoshima, from Yodoyabashi.

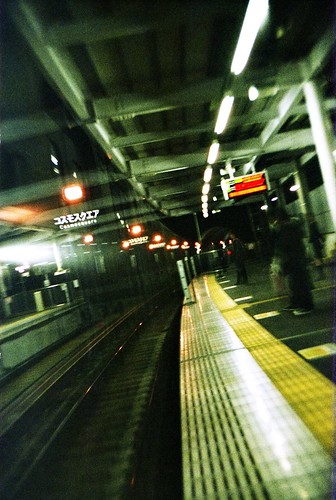
If people are moving around, though, it'll be obvious what you did. Umeda subway station.
You can play with the effect, of course; here the train is arriving at Kita Ikoma station.

Or really play with it - here's an impressionistic portrait of Ritsuko in a Kobe pub. Not that you'd know by looking at it.
This is a seriously fun camera. The kit is one of Otona No Kagaku's all-time best-sellers, and for good reason. It's made to be easily tweakable by its users, and there's thriving communities dedicated to hacking and playing with it. Change the aperture, make it square-format, swap lenses, make it a pinhole camera, take it underwater, add a finder prism - you can easily spend so much time playing with the design you forget to take pictures.
But the pictures are not bad at all. The cheap lens and vignetting imparts an ethereal, otherworldy quality to the most mundane scenes. The low resolution and heavy off-center blurring means that even low-end lab scans can bring out all that the camera has to offer. And the finder ensures you'll always be surprised - positively, more often than not - by the pictures you get back. Here's the full set of images
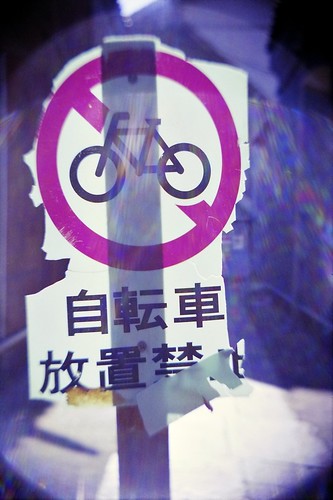
No Bikes. Karahori, Osaka.
Uhm now I know how some shaddy people make the pictures that claim to have capture images of ghosts.
ReplyDeleteVery informative!...great pictures too
Wow! I wish I had received as good a present for my birthday.
ReplyDeleteSounds to me like Ritsuko is spoiling you, Janne. I remember the chocolate kits and those were great too.
I wonder if they make anything like this here. Not that I know of, but I should look around.
Thanks for sharing!
I haven't photographed film at all since I got my first digital camera, but I'll give this one a try... looks superfun!
ReplyDeleteWhere can I buy a brand new Gakkenflex TLR? Care to tell please
ReplyDeleteI have no idea. Perhaps look for the set online?
ReplyDelete