Wednesday, October 30, 2013
The Pupillary Light Reflex and Your Attention
Here's a quick note of a couple of interesting papers: Attention to Bright Surfaces Enhances the Pupillary Light Reflex (Journal of Neuroscience — paywalled) and The Pupillary Light Response Reveals the Focus of Covert Visual Attention (PLoS One, Open Access)
The pupillary light response is the reflex that contracts the pupil in bright light to let less light in, and relaxes (opens) it in darkness. It's exactly like the aperture on a camera, and one of the ways we adapt our eyes to very different light levels. Just like a camera aperture, by the way, the pupil size also changes the depth of field. That's one reason it's much harder to read in dim light than in bright light when you are middle aged and have presbyopia.
The thing about the light response is that it's completely automatic. A circuit senses the amount of light coming in, and if it's way bright it contracts the pupil a bit; if it's really dark it relaxes it. Separately, the pupils can also actively dilate when you get excited; you see something (or someone...) that really interests you, the pupils will react along with your blood pressure, sweat glands and so on. But that's independent of the light level.
What these papers show is that the light level-adaptation is not quite as independent and automatic as we thought. The amount of dilation depends not just on the overall light level, or the light at the point of focus, or even the amount of light we believe is coming in (rather than the amount that is actually coming in), but also on the brightness of the area you're mentally attending to.
Let's say you keep your eyes fixed on one spot. But your attention wanders across the scene. If you attend a bright area — a shining lamp, say — then your pupils will contract a bit, even though the amount of light coming in the eyes doesn't change. And if you then attend to a spot in deep shadow, the pupils will relax to let more light in.
This makes sense of course. You want the spot you're attending to to be clearly visible; not too bright and not too dark. So the pupils should adapt to that area specifically, not just to the whole scene on average.
The first paper shows that the response is stronger with larger differences in luminance. So attending to a a brighter target will constrict the pupil more. Darker targets did not dilate more, though, and it's not clear to me why.
The second paper uses a cueing experiment to show that the amount of constriction is connected to the reaction speed when the cue appears. This probably implies that the constriction also shows how strongly you're attending to the target, as well as the target brightness itself.
In other words, our pupils react to what we're actually attending to; and to how strongly we attend to it.
This is interesting all by itself, but as the second paper points out, this could potentially be useful for tracking covert attention, along with the overt attention we get with eye trackers. A whole generation of experimental psychology theses are waiting to be written using this!
Tuesday, October 15, 2013
Rodinal
Mostly done with the Hanoi pictures. Not finished writing, though.
Meanwhile, I tried Rodinal for the first time this week. Rodinal is a developer for black and white film, it's been around for over a century and is probably the oldest developer still available. It's now called "R09" for the Agfa version and "Adox Adonal" for the Adox version, though they're chemically the same. And it's still a very popular developer for good reasons.
It's inexpensive and very long lasting; you use it mixed 1:25, 1:50 or 1:100, and an opened bottle will be fine for years and years without going bad. And unlike most other developers you can easily mix up just the amount you need, right before you use it. Very practical.
In Japan you can get it (not very cheaply) from graltd.com; the postage is expensive, so you might want to order a larger batch and perhaps split the order with somebody1. But that one bottle will develop about 50 rolls of MF film, which is years worth of photography for me even if I used nothing else.
The developer will give you contrasty, sharp-looking negatives, but will also give you large, sharp grain and lose detail in the shadows. So it's best with slow small-grain films, or with large film formats with proportionally smaller grain. And you should probably overexpose a bit to give you some detail in deep shadows. Unless, of course, you want that grungy look.
I thought I'd try Rodinal on the film I shot in Hanoi, but quickly realized that was not a good idea. Better try a new developer with a test roll I don't much care about. So I brought my Pentax 67 on our weekend walk last week, then developed and scanned the roll this weekend.
I took a 120-format roll of Ilford PanF 50, exposed it at ISO 50 as usual, using a handheld meter. I developed it in Rodinal mixed 1:50, at 20°, for 11 minutes. 30 seconds of inversions, then 10 seconds every minute. The pictures were scanned, I set the black and white points, cloned out the most visible dust spots, and a slight bit of unsharp masking. Lastly I sharpened them a bit — you have to, as the scanner will soften the scans. No other contrast enhancement, no noise or grain removal or anything else.
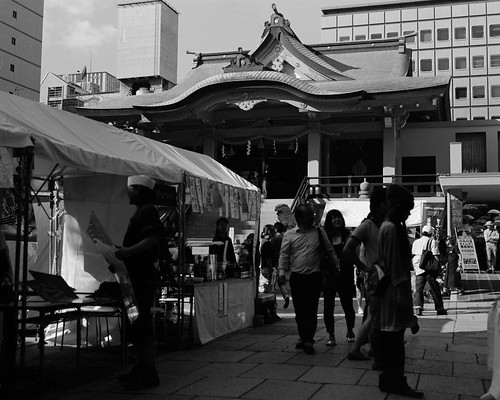
Umbrellas at a festival at Namba temple. This is pretty close to perfect. Smooth, calm gradations, but still feeling sharp and distinct without being overly contrasty. I wish all my pictures came out this well. I exposed for the sky, more or less, which means this is closer to ISO 25 than 50. Shows just how important it is to be generous with exposure for this combination.
Namba temple. This is the opposite of the above. I measured for the sunlit areas, so the shadows got underexposed by about 2 stops. The result is dark, mushy and indistinct. If you try to brighten the dark areas you'll only get lots of big, dense grain without any detail. Lesson: whatever you do, don't underexpose.
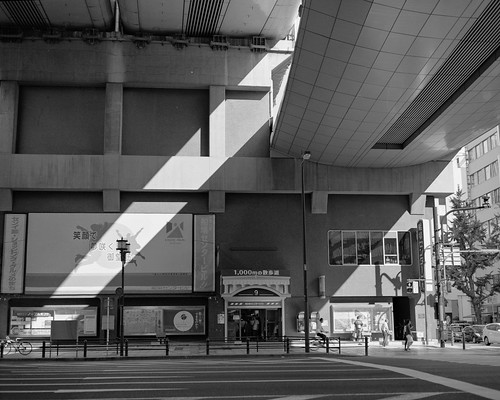
Honmachi highway underpass. Measured for sunlight, then added a stop. The sunlit bits aren't close to blowing out, while the open shadows are smooth and detailed.
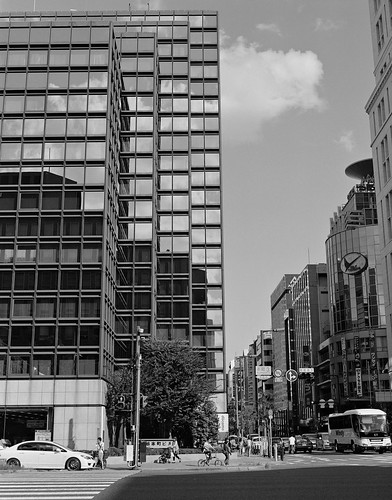
Midosuji street. With straight-on sun and dark shadows the image really is a little contrasty for my taste. A more neutral developer such as D-76, or a less contrasty film, would probably be my first choice in this kind of situation. But if your taste runs toward the strong and bold then this is still quite good.
Self portrait. Strobe-lit through a large diffuser on camera up right, then reflectors on camera left and right in front. Damn I'm getting old...
The lighting is fairly smooth. But the film is contrasty, the developer is contrasty and I don't use a colour filter to reduce skin blemishes. The result is that I look every bit my 44 years of age, with bristly beard, scars, wrinkles, pockmarks and all. Definitely a cool look for some subjects, but it's not exactly flattering.
I'm surprised at just how easy Rodinal is to work with; just pipette and mix it right before you develop. Much better than D-76 where you have to mix and store a whole batch a day ahead. And I've rarely had negatives that needed so little post-processing after development. I basically set the black and white points and I was done. The results are great when properly exposed.
But they do have to be properly exposed, and the PanF-Rodinal combination is pretty contrasty. Next up I think I'll try Delta 400 at ISO 250 and see what that is like. In medium format the grain should still be small enough not to be any kind of problem. Between Rodinal for slow films, and Ilford Microphen for low-light and high speed, I don't see much reason to use anything else from now on.
#1 I notice silversalt.jp lists Adox Adonal for only 1300 yen but is out of stock. I've never bought anything from them so no idea how good they are or what the final cost would be.
Wednesday, October 9, 2013
About the new comment system here on this blog
Some time ago I enabled a new comment system on this blog, and I'm curious about how it is working out for people.
The reason I ask is because it seems it's difficult or impossible to comment unless you have a Google account and logged in to it. And I think you don't even see the comments other people are leaving, which is really bad.
Also, I'm unhappy that the comments look really out of place here. So I think I should perhaps go back to the old comment system instead.
If you have any thoughts about this please email me at: jan.moren+blog@gmail.com - if you have a problem with the comments you can obviously not comment here on this post.
Friday, October 4, 2013
Bonsamatic! Bonsamatic!
The Hanoi pictures take time as usual. Meanwhile I'd like to answer the one question no doubt burning in the back of your throat: "Did Bonsai-kun survive our absence? And if he did, how on earth did he manage?" The answer is "Bonsamatic!" But first, a digression:
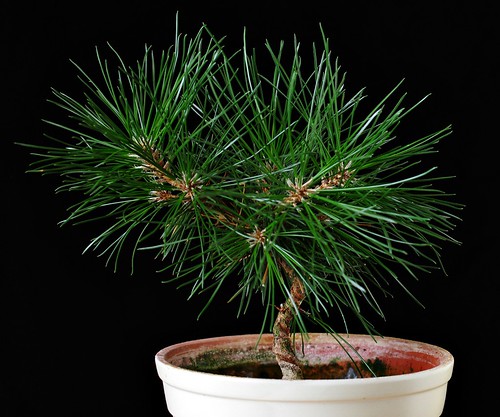
Bonsai-kun. He's a three year-old Japanese black pine. And amazingly still alive after more than six months with us.
I work with big, complicated computer systems to run big, complicated neural models. It's a far cry from the days when I first learned programming on very simple (and very primitive) home computers. But the very simplicity made it a lot of fun. You could learn and understand the entire computer from the inside out.
To recapture some of that fun, I've begun playing with the Arduino in my spare time. It's a series of cheap, simple micro-controller boards with a complete software environment and lots of documentation and examples. You can use it for robotics, home automation or any other kind of electronics project. It's programming stripped to its bare essentials. It's easy to use with electronics and there's a lot of good tutorials around, so if you, like me, have little practical electronics experience, the Arduino is a great way to start.
A bonsai is planted in a fairly small, shallow pot and needs water every day in summer. When you travel, keeping it well watered becomes a real problem. So, what better way to use the Arduino than to help my little black pine friend above survive our week-long absence in Hanoi?
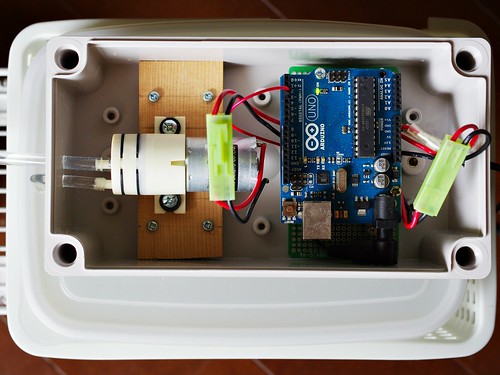
There's four major parts to the Bonsamatic above: The pump and controller housing; below it the water tank (freezer container from a 100-yen shop); an open-air vessel (discarded PET bottle); and the watering tube in the pot, which is just a T-connector and a loop of clear tubing with a few holes drilled into it.
The Bonsamatic Mini is really a simple timer-based plant watering device, with the Arduino acting as the timer. My eventual plan is to have a moisture sensor that tells Bonsamatic when to water, but I didn't have the time to build and calibrate1 the sensor in time for the trip.
The picture above is mostly self-explanatory. When the time is up (I set it to 36 hours), the Arduino runs the water pump for 30 seconds. The pump draws water from the tank below and into the open-air vessel, on to the watering tube and out into the pot.
You might wonder about the open-air vessel. The pump has no active shut-off valve, so water can still flow through it. Without the open-air vessel the end of the tube in the pot would sit lower than the water tank intake and act as a siphon, slowly emptying the tank even without the pump running.
I figured that out the hard way, by the way, when I found my workbench completely soaked ten minutes after a trial run. First lesson of any water-related construction: do all your testing in the bathroom.
Controller housing close-up. You can see the diaphragm pump on the left, the Arduino on the right, while my home-built motor controller board is sitting right underneath the Arduino board. The housing itself is water resistant and designed for outside use. I put the whole thing out on the balcony next to Bonsai-kun, with a 12V cable through the air conditioning duct for power.
The most difficult problem was finding a suitable pump. Small water pumps are used in products everywhere of course, but few retail shops sell them as parts2. You have to go to manufacturers and distributors directly, but they usually deal only with large lots. If I wanted a hundred pumps there's lots of suppliers, but when I want just one there's far less. Some Chinese industrial component websites sell single units, but the freight and handling charges are steep.
Fortunately I discovered this website, where a group of Japanese manufacturers offer all sorts of electronic and mechanical components to designers and hobbyists that don't need big batches of stuff. The site is not an e-commerce site — there's usually no listed prices, you can't order from the site itself and the links simply take you to the manufacturer product pages, but at least you know the stuff is available for people like myself.
There I found this membrane pump from Denso Sangyou. It's perfect — tiny and nearly silent; most versions pump both air and liquid; there's various motor alternatives; and it can pump about 300ml per minute. Bonsai-kun needs about 150ml for a good soak, so it's just the right size. A quick test shows it can pump at least a meter upwards and probably more without a significant reduction in flow.
I sent them an email enquiry in my broken Japanese, and after a few brief exchanges I had ordered two3 of these pumps for a surprisingly low price of 3500 yen each, and a paltry 900 yen shipping charge, cash on delivery. Delivery was quick as well, and arrived just a couple of days after my order. Excellent service.
The pumps work great. A thirty-second run is plenty to water the bonsai. When out on the balcony I can't hear the pump at all, even if I strain to listen; the wind and the traffic below completely drown it out. The motor is rated for 300 hours and the pump housing for far longer, so if I'd regularly use this to water Bonsai-kun the pump would last more than half a century.
My next step is to make a moisture sensor (a couple of nails, a thermistor and a makeshift transistor amplifier) and calibrate it. It will basically involve a cup of soil that I measure when wet and dry, at various temperatures from near-freezing up to 50° or so. Then I'll take a look at that data and find a simple way to model the temperature dependency.
The water tank will be replaced with a larger, more stable version. I also want to get a smaller, cheaper Arduino board to use for this, so I can free the regular board for other things. And I need a way to get data from the Arduino to my web server for a live display of the temperature and moisture — and balcony ambient temperature too while I'm at it. And perhaps measure the light level throughout the day while I'm at it.
The one thing I'm unsure of is if I should always automate the watering in the future, or only use it when we're travelling. On one hand this automated system is really cool. On the other, part of the point of a bonsai is to see it and interact with it on a daily basis, and this would remove some of that. We'll see.
#1 The data from a resistance-based moisture sensor — that is, you measure the resistance between two nails stuck into the soil — depends on the soils temperature. So you need a temperature sensor, and measure how the resistance changes in order to figure out the real moisture level.
#2 Those that do tend to cater to laboratory and medical fields, which means very precise, very clean, very certified and very expensive.
#3 Always try to get spare components when you're tinkering; that way you're not stuck when you break the primary component by accident.
Subscribe to:
Comments (Atom)


